Crispy Pan Pizza Recipe: An Easy Tutorial
### Easy Crispy Pan Pizza: A Straightforward Recipe for Homemade Pleasure
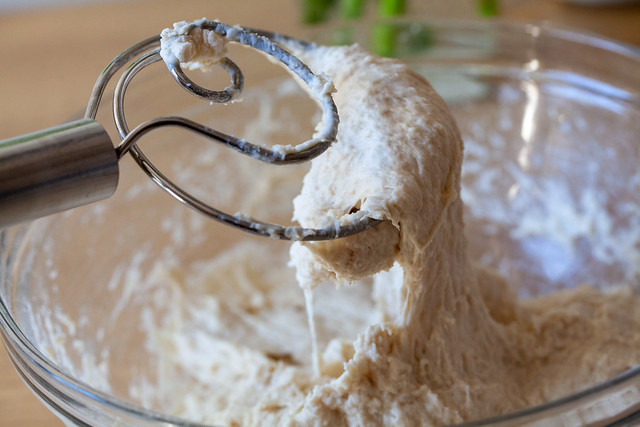
If you’re in the mood for homemade pizza but fear the kneading of the dough, waiting for it to rise, or dealing with special flours, pan pizza is the solution. This technique enables you to whip up a delightful pizza without the fuss, making it an ideal addition to your cooking skills.
#### Why Opt for Pan Pizza?
Pan pizza is remarkably forgiving. Unlike conventional pizza, which can easily turn soggy or burnt, pan pizza boasts a thick, airy crust that supports ample toppings. The baking method is simple: baking at a high temperature for a full 30 minutes guarantees a crispy base and perfectly melted cheese. You don’t require a fancy pizza oven; a regular home oven works perfectly well.
The outcome is a pizza that appears to have taken a lot of effort, featuring a soft crust, blistered cheese, and a pleasing crunch when sliced.
#### Basic Pan Pizza Recipe
**Ingredients:**
**For the Crust:**
– 2 cups (260 grams) all-purpose flour
– 1 teaspoon instant yeast
– 1 teaspoon kosher salt
– 1 cup lukewarm water (100° to 115°F)
– Olive oil
**To Finish:**
– 3/4 cup tomato sauce (store-bought or homemade)
– 6 ounces coarsely grated or torn mozzarella cheese (about 1 1/3 cups)
– 1/4 cup grated pecorino romano or parmesan cheese
– Seasonings (salt, pepper flakes, dried oregano)
– A handful of fresh basil
**Instructions:**
1. **Prepare the Dough:**
– In a large bowl, combine the flour, yeast, and salt with a whisk.
– Pour in the lukewarm water and 1 tablespoon of olive oil. Stir until blended, ensuring there are no dry patches of flour.
– Cover the bowl with plastic wrap and let it sit at room temperature until it has doubled in size, approximately 1.5 to 2 hours. If you wish to postpone baking, the dough can be refrigerated before it completes rising.
2. **Construct the Pizza:**
– Preheat your oven to 450°F (230°C).
– Grease a 12-inch cast-iron skillet with 3 tablespoons of olive oil.
– Transfer the dough into the pan, flipping it to coat both sides in oil. Use oiled fingers to push the dough to the edges, even if it doesn’t stretch completely. Allow it to proof for another 30 minutes, loosely covered.
3. **Top the Pizza:**
– Evenly distribute the tomato sauce over the dough, reaching the edges.
– Top with mozzarella and pecorino or parmesan cheese. Season with salt, pepper flakes, and oregano, then drizzle a tablespoon of olive oil over everything.
4. **Bake the Pizza:**
– Bake for 30 minutes until the edges turn golden brown and the top is toasted. This prolonged baking time guarantees a satisfying crunch.
5. **Serve:**
– Sprinkle fresh basil over the pizza. You can serve it straight from the pan or transfer it onto a cutting board for slicing.
6. **Storage:**
– Leftover slices reheat wonderfully in a foil-covered sheet pan at 350°F or 375°F for 5 to 10 minutes.
#### Conclusion
This easy crispy pan pizza recipe is a transformative option for pizza enthusiasts who desire to relish homemade pizza without complications. With its accommodating nature and delicious results, it’s a dish that can quickly become a family favorite. Whether you stick with the standard toppings or experiment with your favorites, this pan pizza is guaranteed to satisfy your cravings.
Miso-Glazed Chicken Accompanied by Rice
### Cooking Without a Kitchen: Handling Culinary Hurdles
Encountering a kitchen that’s temporarily unavailable, whether due to renovations or unexpected issues like a gas leak, can make it feel overwhelming to sustain a typical cooking routine. Nevertheless, with inventiveness and the appropriate tools, it is entirely feasible to create tasty meals without a completely operational kitchen. Here’s how to adjust and succeed in such scenarios.
#### Key Cooking Tools for a Temporary Kitchen
1. **Countertop Convection Oven**: A small convection oven, like the Breville Smart Oven, acts as a superb substitute for a conventional oven. It heats promptly, cooks food uniformly, and is adaptable enough to manage most recipes that fit within its size limits. This device is especially handy during warmer months as it doesn’t elevate the kitchen temperature like a standard oven.
2. **Plug-in Induction Burner**: For cooking on the stovetop, a portable induction burner can be transformative. Although high-end versions exist, economical camping burners can also meet basic cooking needs. Ensure adequate ventilation when utilizing these burners for safety.
3. **Slow Cooker and Instant Pot**: These appliances are essential for meal prep without an oven or stovetop. They provide hands-off cooking, making it straightforward to create hearty dishes with little effort. Employing an outdoor grill is also a fantastic way to cook during warmer seasons.
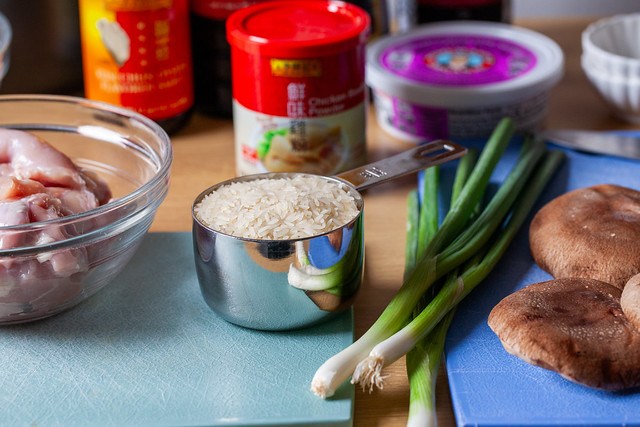
4. **Rice Cooker**: A rice cooker, such as the Zojirushi Micom model, can be surprisingly multifunctional. In addition to cooking rice, it can prepare a variety of dishes, including stews and one-pot meals, making it a crucial tool in a temporary kitchen arrangement.
#### A Recipe to Try: Miso Chicken and Rice
One of the highlight dishes that can be effortlessly prepared in a rice cooker or oven is Miso Chicken and Rice. This recipe is both flavorful and straightforward enough for weeknight meals.
**Ingredients**:
– 2 tablespoons soy sauce
– 1 tablespoon oyster sauce
– 1 tablespoon Shaoxing wine
– 1 tablespoon white or red miso
– 1/2 teaspoon kosher salt (optional)
– 1/2 teaspoon granulated sugar
– 1/2 teaspoon toasted sesame oil
– White or black pepper to taste
– 1 pound boneless, skinless chicken thighs, sliced
– 8 fresh shiitake mushrooms, cut
– 1 cup jasmine rice
– 1 cup chicken broth or water (plus 2 tablespoons for oven method)
– 1/4-inch slice of fresh ginger, minced
– 2 scallions, chopped (whites and greens separated)
**Cooking Instructions**:
*In a Rice Cooker*:
1. Mix soy sauce, oyster sauce, wine, miso, salt (if applying), sugar, sesame oil, and pepper in a bowl. Add chicken and mushrooms, ensuring they are thoroughly coated.
2. In the rice cooker, blend rice, 1 cup broth, and ginger. Place the chicken mixture on top and sprinkle scallion whites.
3. Cook using the Quick or Regular cycle. Verify doneness and modify cooking time if necessary. Serve garnished with scallion greens.
*In the Oven*:
1. Preheat the oven to 350°F (175°C). In a baking dish, mix rice, 1 cup plus 2 tablespoons broth, and ginger. Layer the chicken mixture on top and scatter scallion whites.
2. Cover with foil and bake for 35 to 45 minutes, checking for doneness. Adjust cooking time if required. Serve topped with scallion greens.
#### Conclusion
Cooking without a completely equipped kitchen can pose a challenge, but with the right tools and a touch of creativity, it can also serve as a chance to discover new cooking techniques and recipes. By leveraging countertop appliances and straightforward recipes, anyone can uphold their culinary interests, even in less-than-ideal situations.
Adaptable Grilled Corn Salad Recipe for Every Occasion
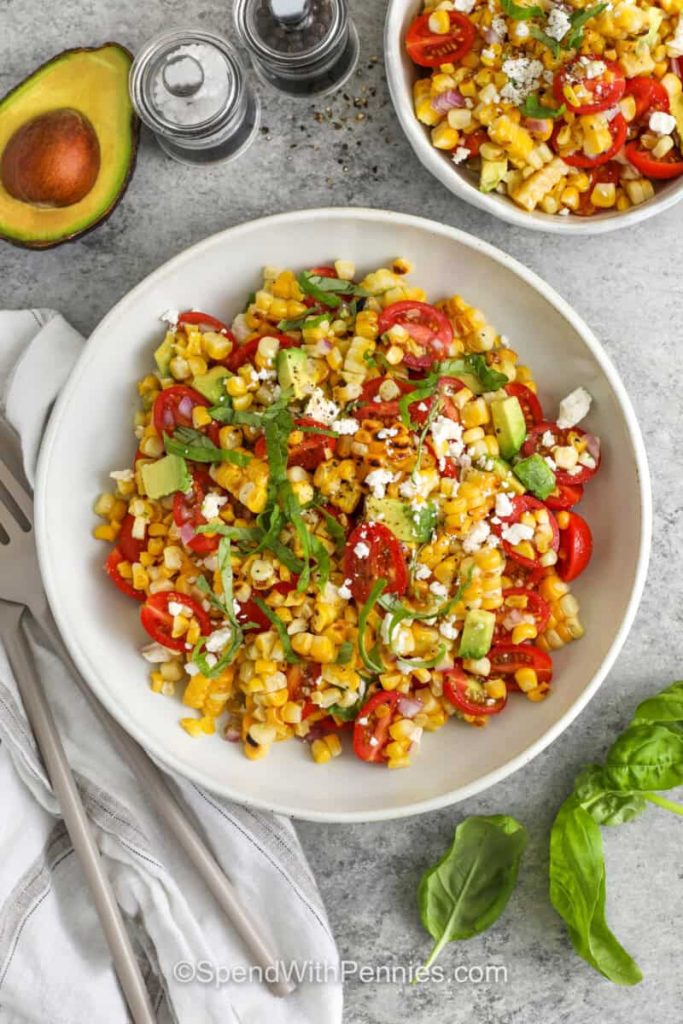
# Grilled Corn Salad: An Easy and Refreshing Summer Side Dish
Grilled Corn Salad is a tasty and invigorating side dish ideal for summer events. Its blend of slightly charred corn, savory feta cheese, and succulent cherry tomatoes delivers a smoky-sweet taste enhanced by a straightforward homemade vinaigrette. Whether at a barbecue, picnic, or potluck, this dish is guaranteed to impress.
## Holly’s Recipe Highlights: Grilled Corn Salad
– **Flavor**: The salad showcases crunchy, charred corn kernels, accented by salty feta cheese and lively cherry tomatoes. A zesty white balsamic vinaigrette and fresh basil add a vibrant, peppery touch to every mouthful.
– **Why Make It**: This adaptable recipe can serve as a side dish, be used as a filling for street tacos, or enjoyed with tortilla chips as a refreshing salsa.
– **Potluck Perfect**: Unlike salads based on lettuce, this light and fresh corn salad maintains its integrity well, making it great for making ahead.
– **Make Ahead**: You can prepare this salad up to one day in advance. Just stir and top with garnish before serving for the optimal experience.
**Total Time**: 40 minutes
**Serving Size**: 4
**Cooking Method**: Grilled and Chilled
## Ingredients for Grilled Corn Salad
– **Corn**: Opt for freshly grilled corn, or for ease, canned or frozen corn might be used. If using frozen or canned corn, mix it with oil and broil until slightly charred to obtain that smoky flavor. Let it cool completely before use.
– **Cheese**: Recommended is crumbled feta cheese; however, for a Mexican flair, cotija cheese can be a great alternative.
– **Fresh Veggies**: Cherry tomatoes and green or red onions add taste and color. You may also include chopped cucumbers, red bell peppers, or diced avocados for added freshness.
– **Dressing**: Dress the salad with a homemade light and tangy vinaigrette, or use a store-bought Italian vinaigrette when short on time. To customize the flavor, think about adding lemon juice, replacing the white balsamic vinegar with a milder vinegar, or mixing in fresh cilantro and garlic.
### Tips for Preparation
– **Removing Corn from the Cob**: To easily slice corn off the cob, place a folded paper towel in a bowl or on a cutting board. Hold the ear of corn upright and cut down the rows with a sharp knife.
– **Grilling Corn**: For the best flavor, grill the corn until it is lightly charred. This boosts the smoky flavor while keeping the corn juicy.
– **Cooling**: Let the corn cool prior to handling to ensure freshness and crispness in the salad.
– **Resting**: Allow the salad to rest for at least 15 minutes before serving to help the flavors combine.
– **Adding Avocado**: To avoid browning, incorporate diced avocado right before serving.
## Storing Leftovers
Keep any leftover salad in an airtight container in the refrigerator for up to 4 days. Remove excess liquid and mix well before serving. Leftovers may be added to tacos, served on crostini, or enjoyed with tortilla chips.
## More Corn Salad Favorites
Discover more corn salad recipes to enhance your summer menu and please your family and friends.
—
Did your family enjoy this Grilled Corn Salad? Share your thoughts and a rating below!
A Complete Manual for Preparing Chicken Wings in an Air Fryer
# Air Fryer Chicken Wings Ready to Serve!
Are you a fan of chicken wings? Do you adore your air fryer? To me, chicken wings and the air fryer create the perfect combination.
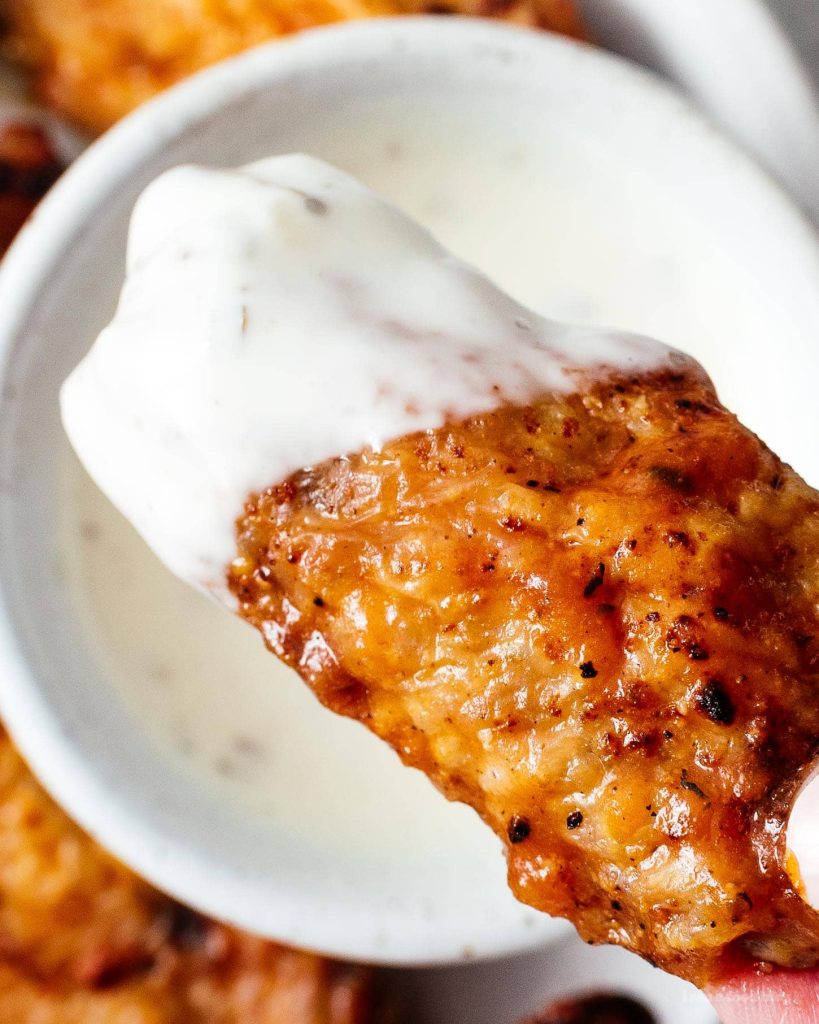
These air fryer chicken wings are quicker than heading to a bar, ordering, and waiting for your wings to fry. Even better, they’re incredibly juicy, delicious, and only need 20 minutes in the air fryer. Plus, they aren’t deep-fried!

## Chicken Wings in Air Fryer: The Perfect Pair
In my opinion, the air fryer is the ideal choice for succulent, crispy chicken wings. Air fryers circulate hot air and oil around the wings, achieving a perfectly crisp exterior while keeping the insides delightfully juicy. Baking wings in an oven may take an hour, but air fryer chicken wings require just 20 minutes from start to finish, ensuring your wings remain moist.
## How to Prepare Air Fryer Chicken Wings
1. **Gently Pat Your Chicken Dry.** Moisture hinders crispiness, so ensure you pat your wings dry with a paper towel.
2. **Lightly Oil.** Coat the chicken lightly with oil by tossing it or spritzing it with cooking spray. This aids in even browning.
3. **Coat the Chicken.** Here’s where the flavor shines. Toss the wings in a large bowl with a bit of baking powder, garlic powder, onion powder, salt, and pepper.
4. **Air Fry.** Lightly spray (or brush) the air fryer basket with oil. Arrange the wings in a single layer, ensuring some space between each wing.
5. **Flip.** Flip the wings and fry them once more.
6. **Toss.** Enjoy the wings as they are or toss them with sauce!

## Cooking Time for Chicken Wings in Air Fryer
Cooking wings in the air fryer takes 20 minutes. Cook your wings for 15 minutes at 400°F, flip them, and cook for another 5 minutes at 400°F. If you desire extra crispy wings, allow them to rest for 5 minutes, and then give them another 5-minute blast at 400°F to achieve that extra crunch.
Cooking times depend on wing size and how packed your air fryer is; for larger wings, consider adding an extra 5 minutes to the cooking time.
## Basic Air Fryer Chicken Wings Recipe
The secret to truly tasty air fryer chicken wings lies in a well-seasoned foundation. You know how wings taste incredibly good and flavorful at restaurants in a way that seems elusive at home? The trick is to season your wings before adding any sauce. It’s layers of flavor that go all the way through!
For these wings, I coated them with a bit of baking powder, plus some salt, garlic powder, onion powder, and pepper. The outcome was unbelievably juicy, crisp, and flavorful.
This simple seasoning mix of salt, garlic, onion, and pepper serves as the perfect foundational layer for any sauce. It will enhance your wings’ flavor, making them extra saucy (since the sauce will adhere better) and extra delicious.

## Extra Crispy Air Fryer Chicken Wings
The trick to achieving extra crispy air fryer chicken wings is baking powder (not baking soda) along with salt. Essentially, the pH of the baking powder helps the wings brown more easily. A touch of salt pulls any excess moisture from the skin’s surface, allowing your air-fried chicken wings to turn out crispy and golden.

## Buffalo Wings vs Other Sauces
These wings are perfectly enjoyable on their own. But variety is the spice of life, right?!
Air fryer chicken wings are perfect for making buffalo wings. Buffalo wings are incredibly straightforward: equal parts Frank’s Red Hot and melted butter. We like to diversify by using other hot sauces too, such as sriracha or Crystal buffalo.
In truth, we frequently cut down on the butter or omit it altogether for a healthier option. We created these particular wings using just Secret Aardvark Haban
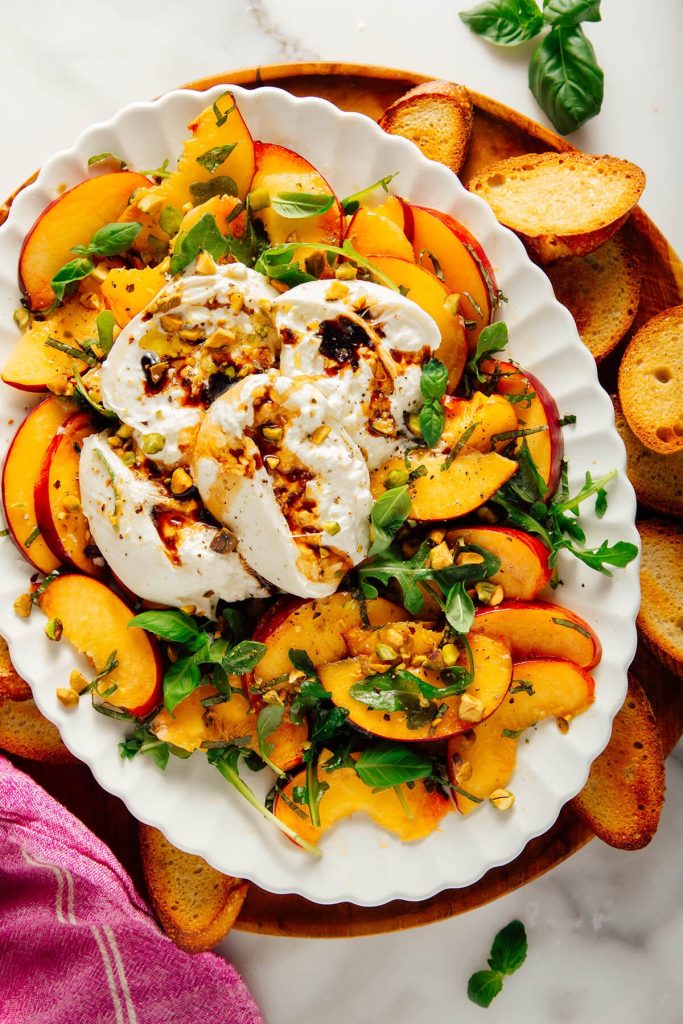
Salad Featuring Fresh Peaches and Silky Burrata Cheese
**Peach and Burrata Salad**
This summer delight is as delicious as it appears! I suspected that my Burrata with Tomatoes and Basil would work wonderfully with peaches instead of tomatoes, and indeed, it’s fantastic. I highly recommend it.
The recipe showcases sliced peaches, fresh arugula and basil, rich burrata, and toasted pistachios, drizzled with olive oil and balsamic vinegar. It’s a lively sweet-and-savory mix that you can present as a salad or as an appetizer.
I adore fresh, straightforward summer recipes like this because they seem and taste gourmet while requiring no cooking whatsoever. This gorgeous recipe is ready in just 15 minutes!
**Serving Suggestions**
This peach salad pairs nicely with other fresh summer dishes and enhances grilled mains. Enjoy it alongside veggie burgers or grilled pizzas, pesto pasta, and grilled corn. It would be delightful with a glass of crisp white wine or rosé.
Please share how your recipe turns out in the comments! I love hearing from you and hope this one turns into a dish you anticipate each summer.
**Peach and Burrata Salad**
This summer peach salad is garnished with fresh arugula, basil, pistachios, and balsamic vinegar. Burrata cheese offers the perfect creamy touch. Recipe serves 4 salad portions or 6 appetizer portions.
**Instructions**
1. In a shallow serving bowl, mix the peaches, arugula, and basil. Drizzle in 1 tablespoon of olive oil and 1 teaspoon of vinegar, and stir to combine all ingredients.
2. Carefully tear open each ball of burrata and place them in the center of the peach mixture. Drizzle the burrata with the remaining 1 teaspoon of olive oil and 1 teaspoon of balsamic vinegar. Top the dish with the pistachios, some reserved basil leaves, and a pinch of black pepper. If desired, add a sprinkle of flaky salt over the cheese.
3. Serve with crostini or crusty bread on the side, if desired. This dish is best enjoyed the day it’s prepared, but leftovers can be stored in the refrigerator for several days, covered.
**Notes**
*Change it up:* This dish would also be fantastic with slices of fresh mozzarella or smaller mozzarella balls if burrata isn’t available.
**Nutrition**
The information provided is an estimate from an online nutrition calculator. It should not be viewed as a replacement for professional nutritionist advice. See our complete nutrition disclosure here.

Crispy Pan Pizza Recipe: An Easy Tutorial
### Easy Crispy Pan Pizza: A Straightforward Recipe for Homemade Pleasure
If you’re in the mood for homemade pizza but fear the kneading of the dough, waiting for it to rise, or dealing with special flours, pan pizza is the solution. This technique enables you to whip up a delightful pizza without the fuss, making it an ideal addition to your cooking skills.
#### Why Opt for Pan Pizza?
Pan pizza is remarkably forgiving. Unlike conventional pizza, which can easily turn soggy or burnt, pan pizza boasts a thick, airy crust that supports ample toppings. The baking method is simple: baking at a high temperature for a full 30 minutes guarantees a crispy base and perfectly melted cheese. You don’t require a fancy pizza oven; a regular home oven works perfectly well.
The outcome is a pizza that appears to have taken a lot of effort, featuring a soft crust, blistered cheese, and a pleasing crunch when sliced.
#### Basic Pan Pizza Recipe
**Ingredients:**
**For the Crust:**
– 2 cups (260 grams) all-purpose flour
– 1 teaspoon instant yeast
– 1 teaspoon kosher salt
– 1 cup lukewarm water (100° to 115°F)
– Olive oil
**To Finish:**
– 3/4 cup tomato sauce (store-bought or homemade)
– 6 ounces coarsely grated or torn mozzarella cheese (about 1 1/3 cups)
– 1/4 cup grated pecorino romano or parmesan cheese
– Seasonings (salt, pepper flakes, dried oregano)
– A handful of fresh basil
**Instructions:**
1. **Prepare the Dough:**
– In a large bowl, combine the flour, yeast, and salt with a whisk.
– Pour in the lukewarm water and 1 tablespoon of olive oil. Stir until blended, ensuring there are no dry patches of flour.
– Cover the bowl with plastic wrap and let it sit at room temperature until it has doubled in size, approximately 1.5 to 2 hours. If you wish to postpone baking, the dough can be refrigerated before it completes rising.
2. **Construct the Pizza:**
– Preheat your oven to 450°F (230°C).
– Grease a 12-inch cast-iron skillet with 3 tablespoons of olive oil.
– Transfer the dough into the pan, flipping it to coat both sides in oil. Use oiled fingers to push the dough to the edges, even if it doesn’t stretch completely. Allow it to proof for another 30 minutes, loosely covered.
3. **Top the Pizza:**
– Evenly distribute the tomato sauce over the dough, reaching the edges.
– Top with mozzarella and pecorino or parmesan cheese. Season with salt, pepper flakes, and oregano, then drizzle a tablespoon of olive oil over everything.
4. **Bake the Pizza:**
– Bake for 30 minutes until the edges turn golden brown and the top is toasted. This prolonged baking time guarantees a satisfying crunch.
5. **Serve:**
– Sprinkle fresh basil over the pizza. You can serve it straight from the pan or transfer it onto a cutting board for slicing.
6. **Storage:**
– Leftover slices reheat wonderfully in a foil-covered sheet pan at 350°F or 375°F for 5 to 10 minutes.
#### Conclusion
This easy crispy pan pizza recipe is a transformative option for pizza enthusiasts who desire to relish homemade pizza without complications. With its accommodating nature and delicious results, it’s a dish that can quickly become a family favorite. Whether you stick with the standard toppings or experiment with your favorites, this pan pizza is guaranteed to satisfy your cravings.
Read More
Miso-Glazed Chicken Accompanied by Rice
### Cooking Without a Kitchen: Handling Culinary Hurdles
Encountering a kitchen that’s temporarily unavailable, whether due to renovations or unexpected issues like a gas leak, can make it feel overwhelming to sustain a typical cooking routine. Nevertheless, with inventiveness and the appropriate tools, it is entirely feasible to create tasty meals without a completely operational kitchen. Here’s how to adjust and succeed in such scenarios.
#### Key Cooking Tools for a Temporary Kitchen
1. **Countertop Convection Oven**: A small convection oven, like the Breville Smart Oven, acts as a superb substitute for a conventional oven. It heats promptly, cooks food uniformly, and is adaptable enough to manage most recipes that fit within its size limits. This device is especially handy during warmer months as it doesn’t elevate the kitchen temperature like a standard oven.
2. **Plug-in Induction Burner**: For cooking on the stovetop, a portable induction burner can be transformative. Although high-end versions exist, economical camping burners can also meet basic cooking needs. Ensure adequate ventilation when utilizing these burners for safety.
3. **Slow Cooker and Instant Pot**: These appliances are essential for meal prep without an oven or stovetop. They provide hands-off cooking, making it straightforward to create hearty dishes with little effort. Employing an outdoor grill is also a fantastic way to cook during warmer seasons.
4. **Rice Cooker**: A rice cooker, such as the Zojirushi Micom model, can be surprisingly multifunctional. In addition to cooking rice, it can prepare a variety of dishes, including stews and one-pot meals, making it a crucial tool in a temporary kitchen arrangement.
#### A Recipe to Try: Miso Chicken and Rice
One of the highlight dishes that can be effortlessly prepared in a rice cooker or oven is Miso Chicken and Rice. This recipe is both flavorful and straightforward enough for weeknight meals.
**Ingredients**:
– 2 tablespoons soy sauce
– 1 tablespoon oyster sauce
– 1 tablespoon Shaoxing wine
– 1 tablespoon white or red miso
– 1/2 teaspoon kosher salt (optional)
– 1/2 teaspoon granulated sugar
– 1/2 teaspoon toasted sesame oil
– White or black pepper to taste
– 1 pound boneless, skinless chicken thighs, sliced
– 8 fresh shiitake mushrooms, cut
– 1 cup jasmine rice
– 1 cup chicken broth or water (plus 2 tablespoons for oven method)
– 1/4-inch slice of fresh ginger, minced
– 2 scallions, chopped (whites and greens separated)
**Cooking Instructions**:
*In a Rice Cooker*:
1. Mix soy sauce, oyster sauce, wine, miso, salt (if applying), sugar, sesame oil, and pepper in a bowl. Add chicken and mushrooms, ensuring they are thoroughly coated.
2. In the rice cooker, blend rice, 1 cup broth, and ginger. Place the chicken mixture on top and sprinkle scallion whites.
3. Cook using the Quick or Regular cycle. Verify doneness and modify cooking time if necessary. Serve garnished with scallion greens.
*In the Oven*:
1. Preheat the oven to 350°F (175°C). In a baking dish, mix rice, 1 cup plus 2 tablespoons broth, and ginger. Layer the chicken mixture on top and scatter scallion whites.
2. Cover with foil and bake for 35 to 45 minutes, checking for doneness. Adjust cooking time if required. Serve topped with scallion greens.
#### Conclusion
Cooking without a completely equipped kitchen can pose a challenge, but with the right tools and a touch of creativity, it can also serve as a chance to discover new cooking techniques and recipes. By leveraging countertop appliances and straightforward recipes, anyone can uphold their culinary interests, even in less-than-ideal situations.
Read More
Adaptable Grilled Corn Salad Recipe for Every Occasion
# Grilled Corn Salad: An Easy and Refreshing Summer Side Dish
Grilled Corn Salad is a tasty and invigorating side dish ideal for summer events. Its blend of slightly charred corn, savory feta cheese, and succulent cherry tomatoes delivers a smoky-sweet taste enhanced by a straightforward homemade vinaigrette. Whether at a barbecue, picnic, or potluck, this dish is guaranteed to impress.
## Holly’s Recipe Highlights: Grilled Corn Salad
– **Flavor**: The salad showcases crunchy, charred corn kernels, accented by salty feta cheese and lively cherry tomatoes. A zesty white balsamic vinaigrette and fresh basil add a vibrant, peppery touch to every mouthful.
– **Why Make It**: This adaptable recipe can serve as a side dish, be used as a filling for street tacos, or enjoyed with tortilla chips as a refreshing salsa.
– **Potluck Perfect**: Unlike salads based on lettuce, this light and fresh corn salad maintains its integrity well, making it great for making ahead.
– **Make Ahead**: You can prepare this salad up to one day in advance. Just stir and top with garnish before serving for the optimal experience.
**Total Time**: 40 minutes
**Serving Size**: 4
**Cooking Method**: Grilled and Chilled
## Ingredients for Grilled Corn Salad
– **Corn**: Opt for freshly grilled corn, or for ease, canned or frozen corn might be used. If using frozen or canned corn, mix it with oil and broil until slightly charred to obtain that smoky flavor. Let it cool completely before use.
– **Cheese**: Recommended is crumbled feta cheese; however, for a Mexican flair, cotija cheese can be a great alternative.
– **Fresh Veggies**: Cherry tomatoes and green or red onions add taste and color. You may also include chopped cucumbers, red bell peppers, or diced avocados for added freshness.
– **Dressing**: Dress the salad with a homemade light and tangy vinaigrette, or use a store-bought Italian vinaigrette when short on time. To customize the flavor, think about adding lemon juice, replacing the white balsamic vinegar with a milder vinegar, or mixing in fresh cilantro and garlic.
### Tips for Preparation
– **Removing Corn from the Cob**: To easily slice corn off the cob, place a folded paper towel in a bowl or on a cutting board. Hold the ear of corn upright and cut down the rows with a sharp knife.
– **Grilling Corn**: For the best flavor, grill the corn until it is lightly charred. This boosts the smoky flavor while keeping the corn juicy.
– **Cooling**: Let the corn cool prior to handling to ensure freshness and crispness in the salad.
– **Resting**: Allow the salad to rest for at least 15 minutes before serving to help the flavors combine.
– **Adding Avocado**: To avoid browning, incorporate diced avocado right before serving.
## Storing Leftovers
Keep any leftover salad in an airtight container in the refrigerator for up to 4 days. Remove excess liquid and mix well before serving. Leftovers may be added to tacos, served on crostini, or enjoyed with tortilla chips.
## More Corn Salad Favorites
Discover more corn salad recipes to enhance your summer menu and please your family and friends.
—
Did your family enjoy this Grilled Corn Salad? Share your thoughts and a rating below!
Read More
A Complete Manual for Preparing Chicken Wings in an Air Fryer
# Air Fryer Chicken Wings Ready to Serve!
Are you a fan of chicken wings? Do you adore your air fryer? To me, chicken wings and the air fryer create the perfect combination.
These air fryer chicken wings are quicker than heading to a bar, ordering, and waiting for your wings to fry. Even better, they’re incredibly juicy, delicious, and only need 20 minutes in the air fryer. Plus, they aren’t deep-fried!

## Chicken Wings in Air Fryer: The Perfect Pair
In my opinion, the air fryer is the ideal choice for succulent, crispy chicken wings. Air fryers circulate hot air and oil around the wings, achieving a perfectly crisp exterior while keeping the insides delightfully juicy. Baking wings in an oven may take an hour, but air fryer chicken wings require just 20 minutes from start to finish, ensuring your wings remain moist.
## How to Prepare Air Fryer Chicken Wings
1. **Gently Pat Your Chicken Dry.** Moisture hinders crispiness, so ensure you pat your wings dry with a paper towel.
2. **Lightly Oil.** Coat the chicken lightly with oil by tossing it or spritzing it with cooking spray. This aids in even browning.
3. **Coat the Chicken.** Here’s where the flavor shines. Toss the wings in a large bowl with a bit of baking powder, garlic powder, onion powder, salt, and pepper.
4. **Air Fry.** Lightly spray (or brush) the air fryer basket with oil. Arrange the wings in a single layer, ensuring some space between each wing.
5. **Flip.** Flip the wings and fry them once more.
6. **Toss.** Enjoy the wings as they are or toss them with sauce!

## Cooking Time for Chicken Wings in Air Fryer
Cooking wings in the air fryer takes 20 minutes. Cook your wings for 15 minutes at 400°F, flip them, and cook for another 5 minutes at 400°F. If you desire extra crispy wings, allow them to rest for 5 minutes, and then give them another 5-minute blast at 400°F to achieve that extra crunch.
Cooking times depend on wing size and how packed your air fryer is; for larger wings, consider adding an extra 5 minutes to the cooking time.
## Basic Air Fryer Chicken Wings Recipe
The secret to truly tasty air fryer chicken wings lies in a well-seasoned foundation. You know how wings taste incredibly good and flavorful at restaurants in a way that seems elusive at home? The trick is to season your wings before adding any sauce. It’s layers of flavor that go all the way through!
For these wings, I coated them with a bit of baking powder, plus some salt, garlic powder, onion powder, and pepper. The outcome was unbelievably juicy, crisp, and flavorful.
This simple seasoning mix of salt, garlic, onion, and pepper serves as the perfect foundational layer for any sauce. It will enhance your wings’ flavor, making them extra saucy (since the sauce will adhere better) and extra delicious.

## Extra Crispy Air Fryer Chicken Wings
The trick to achieving extra crispy air fryer chicken wings is baking powder (not baking soda) along with salt. Essentially, the pH of the baking powder helps the wings brown more easily. A touch of salt pulls any excess moisture from the skin’s surface, allowing your air-fried chicken wings to turn out crispy and golden.

## Buffalo Wings vs Other Sauces
These wings are perfectly enjoyable on their own. But variety is the spice of life, right?!
Air fryer chicken wings are perfect for making buffalo wings. Buffalo wings are incredibly straightforward: equal parts Frank’s Red Hot and melted butter. We like to diversify by using other hot sauces too, such as sriracha or Crystal buffalo.
In truth, we frequently cut down on the butter or omit it altogether for a healthier option. We created these particular wings using just Secret Aardvark Haban
Read More
Salad Featuring Fresh Peaches and Silky Burrata Cheese
**Peach and Burrata Salad**
This summer delight is as delicious as it appears! I suspected that my Burrata with Tomatoes and Basil would work wonderfully with peaches instead of tomatoes, and indeed, it’s fantastic. I highly recommend it.
The recipe showcases sliced peaches, fresh arugula and basil, rich burrata, and toasted pistachios, drizzled with olive oil and balsamic vinegar. It’s a lively sweet-and-savory mix that you can present as a salad or as an appetizer.
I adore fresh, straightforward summer recipes like this because they seem and taste gourmet while requiring no cooking whatsoever. This gorgeous recipe is ready in just 15 minutes!
**Serving Suggestions**
This peach salad pairs nicely with other fresh summer dishes and enhances grilled mains. Enjoy it alongside veggie burgers or grilled pizzas, pesto pasta, and grilled corn. It would be delightful with a glass of crisp white wine or rosé.
Please share how your recipe turns out in the comments! I love hearing from you and hope this one turns into a dish you anticipate each summer.
**Peach and Burrata Salad**
This summer peach salad is garnished with fresh arugula, basil, pistachios, and balsamic vinegar. Burrata cheese offers the perfect creamy touch. Recipe serves 4 salad portions or 6 appetizer portions.
**Instructions**
1. In a shallow serving bowl, mix the peaches, arugula, and basil. Drizzle in 1 tablespoon of olive oil and 1 teaspoon of vinegar, and stir to combine all ingredients.
2. Carefully tear open each ball of burrata and place them in the center of the peach mixture. Drizzle the burrata with the remaining 1 teaspoon of olive oil and 1 teaspoon of balsamic vinegar. Top the dish with the pistachios, some reserved basil leaves, and a pinch of black pepper. If desired, add a sprinkle of flaky salt over the cheese.
3. Serve with crostini or crusty bread on the side, if desired. This dish is best enjoyed the day it’s prepared, but leftovers can be stored in the refrigerator for several days, covered.
**Notes**
*Change it up:* This dish would also be fantastic with slices of fresh mozzarella or smaller mozzarella balls if burrata isn’t available.
**Nutrition**
The information provided is an estimate from an online nutrition calculator. It should not be viewed as a replacement for professional nutritionist advice. See our complete nutrition disclosure here.
Read More
Watermelon Martini: An Invigorating Cocktail Recipe
### Kick Off Summer with a Tasty Watermelon Martini
This Watermelon Martini is a light and invigorating cocktail that captures the sweet, juicy essence of fresh watermelon in every sip. Crafted with straightforward ingredients and shaken until perfectly icy, it’s a lively drink that’s perfect for hot summer afternoons, backyard parties, or happy hour at your place. The naturally sweet watermelon complements vodka splendidly, creating a smooth and fruity martini that’s both sophisticated and simple to prepare.
#### Ingredients for the Recipe
– **Vodka** – The primary spirit in this cocktail.
– **Fresh Watermelon Juice** – Created by blending watermelon in a blender or food processor.
– **Simple Syrup** – Introduces sweetness to amplify the sweetness of the watermelon.
– **Cointreau** – Alternatively, use triple sec or any orange liqueur of your choice.
#### Steps to Prepare A Watermelon Martini
1. **Blend Watermelon**: Put pieces of watermelon into a blender or food processor and blend until smooth.
2. **Strain Juice**: Strain the blended watermelon into a measuring cup using a fine mesh strainer to eliminate all the pulp and seeds.
3. **Combine Ingredients**: In a cocktail shaker filled with ice, add the vodka, Cointreau, fresh lime juice, watermelon juice, and simple syrup.
4. **Shake**: Shake vigorously for 30 seconds.
5. **Serve**: Pour into your preferred martini glass, garnish with a slice of watermelon, and savor!
#### Frequently Asked Questions
– **What can I use to garnish my watermelon cocktail?**
Options for garnishing this martini include a sugared rim, a slice of watermelon, or small watermelon pieces on a toothpick. A mint leaf can also be added for decorative purposes.
– **Is vodka required for this watermelon martini recipe?**
No, if you wish, you can substitute gin as the primary alcohol in this cocktail.
#### Storage Guidelines
You can keep this watermelon vodka martini in your refrigerator for 1-2 days.
#### Additional Cocktail Recipes To Enjoy
Having the appropriate tools makes crafting homemade cocktails easier, more reliable, and more enjoyable. Delight in this Watermelon Martini and discover other refreshing cocktails to elevate your summer experience.
Drink responsibly. This post and recipe are designed for individuals of legal drinking age.
Read More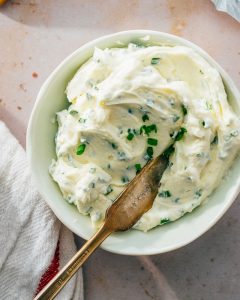
Cream Cheese with Chives
Recipes by Alex & Sonja
Introducing Alex and Sonja Overhiser, the energetic pair behind the well-loved food blog, A Couple Cooks. As authors of cookbooks, active parents, and a genuine couple, they have been documenting their culinary adventures since 2010. Their blog serves as a rich resource for straightforward, seasonal recipes, healthy meal prep strategies, and the simple pleasure of cooking as a family unit. Each recipe is carefully crafted and photographed by Alex and Sonja, guaranteeing a personal touch in every creation. Additionally, every recipe undergoes thorough testing by their two children, making them ideal for family meals.
The Inspiration Behind A Couple Cooks
The Overhisers’ enthusiasm for cooking started as a collective pastime, which soon transformed into a passion for crafting and sharing wholesome, delightful meals. Their mission is to motivate others to take up home cooking, utilizing fresh and seasonal produce. They maintain that cooking should be enjoyable and accessible to all, regardless of expertise.
What You’ll Find on A Couple Cooks
The blog hosts a diverse selection of recipes, ranging from swift weeknight meals to grand weekend celebrations. Whether you’re in search of vegetarian, vegan, or gluten-free choices, Alex and Sonja cater to every palate. Their recipes are crafted to be both nourishing and gratifying, demonstrating that healthy eating can be anything but dull.
Healthy Meal Planning Tips
Beyond recipes, A Couple Cooks provides insightful tips on meal planning and prep. Alex and Sonja recognize the hurdles of balancing busy lives with healthy dining, so they offer practical strategies for efficient meal planning, minimizing food waste, and maximizing your time in the kitchen.
The Joy of Cooking Together
A fundamental principle of A Couple Cooks is the joy derived from cooking together. Alex and Sonja promote couples and families to engage in the kitchen, crafting meals and memories side by side. Cooking transcends mere food; it’s about the experience and the bonds formed throughout the process.
Conclusion
Recipes by Alex and Sonja Overhiser offer more than merely delightful dishes; they present an entryway to a healthier, more interconnected way of living. Through their blog, A Couple Cooks, they continue to motivate countless individuals and families to explore the joys of cooking and dining together. Whether you’re an experienced cook or an amateur in the kitchen, Alex and Sonja’s recipes are guaranteed to add flavor and enjoyment to your table.
Read More
Whiskey and Ginger Ale Drink
Recipes by Alex & Sonja
Introducing Alex & Sonja Overhiser, the energetic pair behind the beloved food blog, A Couple Cooks. As authors of cookbooks, active parents, and a couple who genuinely enjoys cooking together, they have been motivating home chefs since 2010. Their adventure started with a desire to share uncomplicated, seasonal recipes that bring happiness to both the kitchen and the dining table.
Alex and Sonja’s cooking philosophy is centered around crafting nutritious, tasty meals that everyone can make. Their recipes emphasize fresh, seasonal produce, making it simple for home cooks to add healthy foods into their everyday routines. Whether you’re just starting in the kitchen or are an experienced chef, their friendly approach and straightforward instructions make cooking a pleasurable experience.
A highlight of A Couple Cooks is the couple’s commitment to meal planning. They provide useful tips and techniques to assist busy families in organizing their meals effectively, making healthy eating both attainable and enjoyable. With two kids of their own, Alex and Sonja are well aware of the challenges in balancing family life with nutritious meal prep, and they generously share their insights with their audience.
Each recipe featured on their blog is carefully composed and beautifully photographed by Alex and Sonja themselves. Their meticulous attention to detail guarantees that every dish not only tastes incredible but also presents beautifully. The couple’s two children serve as the ultimate taste testers, ensuring that each recipe is kid-approved and family-friendly.
From fulfilling breakfasts to satisfying dinners, and everything in between, A Couple Cooks presents a wide variety of recipes to cater to all preferences and dietary needs. Whether you’re in search of vegetarian choices, gluten-free meals, or decadent desserts, Alex and Sonja have you covered.
Alongside their blog, Alex and Sonja have penned cookbooks that delve deeper into their passion for cooking and sharing meals with family and friends. Their books reflect their dedication to making healthy, delightful food available to everyone.
Join Alex and Sonja on their culinary adventure and experience the pleasure of cooking with A Couple Cooks. With their support, you’ll discover that preparing wholesome, flavorful meals is not only feasible but also deeply satisfying.
Read More
An All-Encompassing Manual to the 60 Finest Salad Recipes
Here are my perpetual favorite salad recipes, ranging from fresh green salads and robust grain and bean salads to pasta salads: each one a tried-and-true favorite deserving of regular preparation!
During the 15 years I’ve dedicated to recipe creation, I’ve observed that a great salad isn’t solely about the ingredients: it’s also about contrasts. You need a crunchy element alongside a creamy one, sharp flavors beside sweet ones, and an array of vibrant colors.
When someone inquires about my most consumed foods, I always respond, “a delicious salad!” Here’s a compilation of my beloved salad recipes that I genuinely enjoy. Each of them was crafted by me and sampled by my actual family. I’ve categorized them by type for your convenience. Let’s make some salad!
Table of Contents
Green Salad Recipes
Green salads form the cornerstone of my salad collection. These recipes feature fresh lettuces, kale, or mixed greens.
1. Chopped Salad: This chopped salad has attained legendary status in my household. The magic occurs with zesty pepperoncini and my homemade Italian dressing that’s vibrant and perfectly balanced, accompanied by crisp romaine and crunchy vegetables. [Get Recipe](https://www.acouplecooks.com/chopped-salad/)
2. Kale Salad: I’ve presented this massaged kale salad to numerous individuals who claimed they “didn’t enjoy kale” and converted every last one. The secret lies in the preparation: I massage the kale leaves with lemon juice and olive oil until tender, then incorporate freshly grated Parmesan and a dash of red pepper flakes. [Get Recipe](https://www.acouplecooks.com/kale-salad-recipe/)
3. Caesar Salad: My Caesar salad employs a homemade Caesar dressing that’s creamy and garlicky without being overwhelming. The blend of crisp romaine, creamy dressing, crunchy croutons, and sharp Parmesan consistently delivers the ultimate bite. [Get Recipe](https://www.acouplecooks.com/caesar-salad/)
4. Arugula Salad: My arugula salad might be the simplest salad recipe you’ll prepare! You don’t even have to whip up a salad dressing. Simply dress baby arugula with olive oil and lemon juice, then add Parmesan shavings and thinly sliced shallots. Pair it with roasted beets for Arugula Beet Salad. [Get Recipe](https://www.acouplecooks.com/easy-arugula-salad/)
5. Apple Salad: In my family’s favorite apple salad, crisp tart apple slices team up with pomegranate seeds, creamy goat cheese, and crunchy, cinnamon-spiced pecans. Toss them over fresh greens with a tangy maple and apple cider vinegar dressing. Another option is Apple Walnut Salad. [Get Recipe](https://www.acouplecooks.com/apple-salad/)
6. Mediterranean Salad: This salad features crunchy veggies like cucumber and onion, salty bursts of feta cheese and Kalamata olives, and handfuls of fresh herbs. Finish it off with our Greek Salad Dressing. You can also add chicken, salmon, shrimp, or tofu to turn it into a main dish. [Get Recipe](https://www.acouplecooks.com/mediterranean-salad/)
7. Wedge Salad: Classics are classics for a reason, and my favorite classic wedge salad certainly delivers! The crunch of iceberg lettuce against the creamy, savory blue cheese dressing simply makes sense. [Get Recipe](https://www.acouplecooks.com/wedge-salad/)
8. Romaine Lettuce Salad: This romaine salad with a pale green dressing and delicate pink radishes tastes as delightful as it appears. The Green Goddess dressing elevates it, enveloping everything in herby, savory creaminess. Sprinkle with crunchy breadcrumbs, a playful alternative to croutons. [Get Recipe](https://www.acouplecooks.com/romaine-lettuce-salad/)
9. Butter Lettuce Salad: I adore a lovely butter lettuce salad, and this one is a favorite of mine. The delicate lettuce leaves are irresistible when coated in creamy, savory Parmesan Peppercorn dressing and garnished with a few simple veggies and Parmesan shavings. [Get Recipe](https://www.acouplecooks.com/butter-lettuce-salad/)
10. Italian Salad: This Italian salad is brimming with all the right flavors and textures: crisp lettuce, crunchy garlic croutons, and zesty pepperoncini. It’s drizzled with a robust, herby Italian vinaigrette that makes the flavors come alive! It can accompany just about anything. [Get Recipe](https://www.acouplecooks.com/italian-salad/)
11. Mexican Salad: [Get Recipe](https://www.acouplecooks.com/easy-mexican-salad/)
12. Massaged Kale Salad: This massaged kale salad is genuinely my go-to salad recipe: lemony greens,
Read More
Recipe for a Blue Margarita Drink
**How to Prepare a Blue Margarita Pitcher for a Crowd**
If you’re organizing a get-together and aim to dazzle your attendees with a lively and revitalizing cocktail, a Blue Margarita is a superb option. This visually appealing drink merges the traditional tastes of a margarita with the stunning blue color of blue curaçao. Here’s how to make a pitcher that yields eight servings.
**Ingredients:**
– 2 cups of tequila
– 1 cup of blue curaçao
– 1 cup of lime juice
– 3 handfuls of ice
**Instructions:**
1. **Combine the Ingredients:** In a sizable pitcher, mix 2 cups of tequila, 1 cup of blue curaçao, and 1 cup of lime juice. The mixture of these components will yield the ideal blend of sweetness, acidity, and citrus notes.
2. **Incorporate Ice:** Introduce 3 handfuls of ice into the pitcher. Stir the concoction thoroughly until it is completely chilled. The ice will not only cool the beverage but will also slightly dilute it, enhancing its refreshing quality.
3. **Distribute:** After the mixture is cool, pour the Blue Margarita into separate glasses. You may garnish each glass with a lime slice or a salted rim for an added touch of elegance.
**Tips for the Ideal Blue Margarita:**
– **Selecting Tequila:** Choose a high-quality blanco or silver tequila, as its clean and fresh taste pairs well with the other components.
– **Lime Juice:** For the best flavor, freshly squeezed lime juice is advisable, but bottled lime juice can serve as an alternative in a pinch.
– **Blue Curaçao:** This liqueur not only imparts color but also a sweet orange taste. If you prefer a less sugary beverage, feel free to modify the quantity of blue curaçao according to your preference.
– **Presentation:** For a celebratory element, think about serving the margaritas in glasses with salted rims. To achieve this, rub a lime wedge around the rim of each glass and dip it into coarse salt.
This Blue Margarita recipe is ideal for parties and events, providing a wonderful twist on the classic margarita. Its lively color and refreshing flavor are bound to impress your guests. Enjoy responsibly!
Read More